Tuesday, March 31, 2015

11 Butt-Kicking Tabata Exercises


To make the journey from Tabata newbie to pro a bit easier, we called in the big guns: renowned trainers and Greatist Experts Ilen Bell and Kelvin Gary. Bell and Gary each picked one or two of the best moves for each area of the body, with added weights and using bodyweight alone. Each of these four-minute wonders packs a serious punch (just ask my quads after a round of squats), so start with just one or two exercises per workout. 
Feel free to rest for a few minutes in between the 4-minute bouts, or go back-to-back for an added challenge.

THE MOVES

Full Body

1. Burpee: Start standing, then crouch to a low squat position with the hands on the floor. Then, kick feet back to a plank, then down into the bottom of a push-up. Push off the ground and quickly return to the squat position. Last step? Jump up as high as possible before squatting down again and jumping back into the next push-up. 

Lower Body

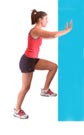
2. Jump squat: Stand with the feet hip-width apart, toes pointing forward. Sit back into a squat (hips below parallel, please!) then drive the whole body up through the heels, shifting weight onto the balls of the feet as you lift off. Be sure to land on the balls of the feet and immediately bend the knees into a full squat. Make sure the knees aren't wobbling side to side while squatting or landing from a jump. 
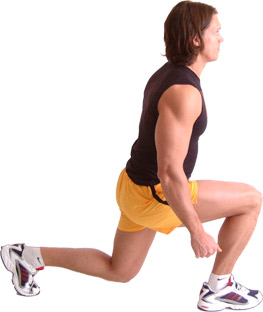
3. Lunge jump: Start standing with the feet together and lunge the right foot forward, bending the knee about 90-degrees and keeping the torso vertical. Then, jump straight up, and while in the air, switch legs and land in a lunge with the left foot forward.

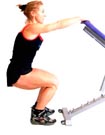
4. Dumbbell front squat: Hold a dumbbell at the sternum (the center of the chest) and do a basic front squat. Place feet a little wider than shoulder-width apart, hips stacked over knees, knees over ankles. Inhale and unlock the hips, bringing them back as the knees begin to bend. Keep the chest and shoulders upright, and continue until the hips are slightly less than 90 degrees from the ground. On the way back up, engage the core and drive through the heels to return to standing.
5. Kettlebell swing: Stand up straight, with feet a bit wider than hip-distance apart. Grab hold of the kettlebell with both hands, keeping the palms face down and arms in front of the body. Keep the knees slightly bent and drive the hips and bell back (it's not a squat, so the knees shouldn't have to bend that much), lowering the body just a bit to an athletic stance. In one fluid motion, explosively drive the hips forward while swinging the kettlebell, engaging the glutes and core. 

Upper Body

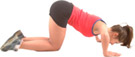
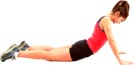
6. Push-up: Get into a plank position with hands planted a little bit wider than shoulder width apart. Keep the elbows close to the body throughout the movement. Ground the toes into the floor and engage the abs and back so the body is neutral. Lower the body in one straight line until the chest touches the floor. Keeping the core engaged, exhale, and push back to the start position. 
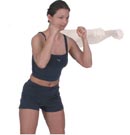
7. Overhead neutral grip press: Stand with the feet shoulder-width apart core tight. Raise the dumbbell, kettlebell, or barbell up to the shoulders with palms facing each other and the elbows below the wrists. Press the weights upward until the arms are fully extended overhead, and then lower back to the shoulders.

Cardio 

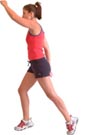
8. Sprints: To get extra speedy, make sure form fits function. Hold the correct posture, with eyes up, chest tall, shoulders relaxed, and arms swinging up and down with the elbows at 45-degree angles. 
9. Stationary bike or rower: Hopping on the bike for a quick spin is pretty self-explanatory, but the indoor rower is a bit trickier. First, strap feet into the foot stretchers, sit up tall, and grab the handle. Roll forward until legs are completely bent and arms are reaching forward. 
From this starting position (called the "catch"), explosively drive the legs back. When the legs are nearly extended, swing the torso back and pull the arms in so the handle is almost touching the rib cage. From here (aka the "finish") recover by stretching the arms straight out, returning the upper body to a straight, vertical position, and bending the legs back to the catch.

Core

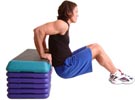
10. Russian twist: Sit on the floor with the knees bent and feet together and lifted a few inches off the floor. With the back at a 45-degree angle from the ground, move the arms from one side to another in a twisting motion. Go super slow, twisting the shoulders completely from side to side.

11. Ski abs: Start in pushup position with hands under the shoulders and core engaged. Jump the feet to the left side of the body, as close to the upper torso as possible. Jump the legs back to a straight plank position and repeat on the right side.
With the exception of the weighted movements, most of these can be performed anywhere, any time. All you need is a set of comfy clothes and a serious work ethic. To make keeping track of the time easier, consider downloading a Tabata timer app. Again, consider meeting with a trainer to go over correct form (even if you've previously done these moves) before starting a Tabata fitness regimen to prevent injury.


3 Shoe-Lacing Methods to Prevent Foot Injuries


Blisters and bunions can thwart even your best-intentioned spring training efforts. Matthew Werd, D.P.M., a triathlete and podiatrist based in Lakeland, Florida, helps you adjust your shoe-tying technique to ease common foot-related woes.
PLUS: Are you wearing the right shoes for your feet? 

1. BLACK TOENAIL

Prevent irritation by lifting the shoe's toe box. Lace the bottom pair of holes as usual, but make the outer section of lace twice as long as it is on the inner side. Bring the shorter piece from the inside through the top hole on the shoe's opposite side. Pull the longer piece up through the next hole on the opposite side. Then bring it down through the hole across from it. Repeat the process with the remaining holes. 

2. SQUISHED TOES

Alleviate pressure by freeing up more room for your feet to move inside your running shoes. As you lace each shoe, skip the bottom pair of holes (the ones nearest to your toes); instead, start threading the lace at the second pair of holes. Then lace the remaining holes upward toward your ankle, using the same pattern and tightness that you would normally use to securely tie your running shoes. 

3. HEEL BLISTER

Make the shoe more snug around your ankle. Lace all of the holes except for the set located closest to your ankle. Thread one end of the lace through the next hole on the same side of the shoe, leaving enough slack in the lace to form a small loop. Repeat the process on the other side of the shoe. Bring each lace through the loop on the opposite side. Pull to tighten, and then tie the shoes as you normally would.


How to Use a Foam Roller to Build Strength


Use a foam roller for postrun recovery? Smart move: This simple tool acts as a deep-tissue massager, working out kinks in overused muscles. But its benefits don't end there—it can also build strength and stability. Because the foam roller has a curved, unstable surface, adding it to an exercise, like a plank, suddenly gives a standard move a challenging twist. 
"Balancing on a foam roller requires your body to recruit more muscles, especially in your core, to perform the move," says Tyler G. Travis, executive director of Lake Erie College of Osteopathic Medicine Medical Fitness and Wellness Center, who created this routine. 
Try to do these exercises two to three times a week (on easy-run days so you're not too wiped out) to build total-body strength that'll help improve performance and guard against injury.

Push-up With Leg Lift

Works chest, triceps, abdominals, glutes

To do: Start in foam-roller plank. Lower your chest toward the roller, keeping your elbows in. Lift your right leg up, then lower it. Repeat the push-up, then lift the left leg. Alternate for three sets of eight to 12 reps. 

Push-up With Arm Lift

Works biceps, triceps, chest, shoulders, abdominals

To do: Lower into a push-up with your left palm on the ground and your right palm on a foam roller. Push up and lift the roller until it's parallel to your chest. Do three sets of eight to 12 reps with each arm.   

Wall Squat

Works quadriceps, glutes, abdominals


To do: Stand with a foam roller between your midback and a wall and your feet shoulder width apart. Slowly squat down toward the floor until the foam roller reaches your shoulder blades. Stand and repeat eight to 12 times for three sets.   

Bridge With Leg Lift

Works glutes, hamstrings, quads, abdominals

To do: Lie on your back, heels on a foam roller. Raise your hips up toward the ceiling, then extend your right leg. Bring your right leg down and hips back to ground. Do three sets of eight to 12 on each leg.


Monday, March 30, 2015

3 Shoe-Lacing Methods to Prevent Foot Injuries


Blisters and bunions can thwart even your best-intentioned spring training efforts. Matthew Werd, D.P.M., a triathlete and podiatrist based in Lakeland, Florida, helps you adjust your shoe-tying technique to ease common foot-related woes.
PLUS: Are you wearing the right shoes for your feet? Check out our list of the Best New Running Shoes to find out. 

1. BLACK TOENAIL

Prevent irritation by lifting the shoe's toe box. Lace the bottom pair of holes as usual, but make the outer section of lace twice as long as it is on the inner side. Bring the shorter piece from the inside through the top hole on the shoe's opposite side. Pull the longer piece up through the next hole on the opposite side. Then bring it down through the hole across from it. Repeat the process with the remaining holes. 

2. SQUISHED TOES

Alleviate pressure by freeing up more room for your feet to move inside your running shoes. As you lace each shoe, skip the bottom pair of holes (the ones nearest to your toes); instead, start threading the lace at the second pair of holes. Then lace the remaining holes upward toward your ankle, using the same pattern and tightness that you would normally use to securely tie your running shoes. 

3. HEEL BLISTER

Make the shoe more snug around your ankle. Lace all of the holes except for the set located closest to your ankle. Thread one end of the lace through the next hole on the same side of the shoe, leaving enough slack in the lace to form a small loop. Repeat the process on the other side of the shoe. Bring each lace through the loop on the opposite side. Pull to tighten, and then tie the shoes as you normally would.

Chicken Veggie Bowl

This quick and easy recipe for veggie chicken bowls features eggplant, carrots, Brussels sprouts and quinoa. 

Chicken-and-Veggie-Bowls
Serves: 4
Hands-on Time: 25 minutes
Total Time: 40 minutes
INGREDIENTS:
  • 1 lb boneless, skinless chicken breast, cut into 1 1/2-inch cubes
  • 3 cups eggplant, trimmed and cubed
  • 2 tbsp plus 1 tsp reduced- sodium soy sauce, divided
  • 2 tbsp rice vinegar
  • 1 tbsp plus 2 tsp sesame oil, divided
  • 2 tbsp peeled and minced fresh ginger
  • 1 1/2 tsp five-spice powder, divided
  • 1 cup quinoa, rinsed
  • 3 cups shredded Brussels sprouts
  • 3/4 cup matchstick-cut carrots
  • 3/4 cup chopped scallions (white and light green parts) plus 1/2 cup chopped scallions (dark green parts), divided
  • 1/2 cup shelled edamame, thawed
  • 12 fresh basil leaves, thinly sliced
 INSTRUCTIONS:
  1. To a large shallow bowl or baking dish, add chicken and eggplant. In a small bowl, whisk together 2 tbsp soy sauce, vinegar, 1 tbsp oil, ginger, 1 tsp five-spice powder and 1 tbsp water. Pour mixture over chicken and eggplant and let marinate at room temperature for 15 minutes.
  2. Meanwhile, cook quinoa according to package directions. Fluff with a fork and transfer to a large bowl.
  3. In a large nonstick skillet on medium-high, add chicken-eggplant mixture with marinade; sauté for 5 minutes. Add Brussels sprouts, carrots, 3⁄4 cup white and light green parts of scallions, 1⁄4 cup dark green parts of scallions, edamame and remaining 1⁄2 tsp five-spice powder. Cook for 10 to 12 minutes, stirring frequently, until chicken is fully cooked and eggplant is tender.
  4. Add chicken mixture to bowl with quinoa. Stir in remaining 1 tsp soy sauce and 2 tsp oil and toss to mix. Top with remaining 1⁄4 cup dark green parts of scallions and basil.


Chicken & Blue Cheese-Stuffed Portobellos


These protein-rich stuffed portobellos are sure to keep you satisfied. 

DSC_7760
Photo: Laura Wright

Serves: 6
Hands-on Time: 35 minutes
Total Time: 55 minutes
INGREDIENTS:
  • 1 1/4 lb boneless, skinless chicken breast
  • Pinch sea salt
  • 1/8 tsp fresh ground black pepper
  • 1/2 cup balsamic vinegar, divided
  • 1 tbsp extra-virgin olive oil
  • 1/4 cup chopped fresh chives, divided
  • 6 portobello mushroom caps, stems and gills removed, rinsed, patted dry
  • 1/2 cup quinoa, rinsed
  • 3 cups chopped, packed baby spinach
  • 1 1/2 oz roasted unsalted walnuts, chopped
  • 2 oz blue or Gorgonzola cheese, crumbled and divided
  • 2 shallots, diced
  • 3 cloves garlic, minced
  • 2 tbsp Dijon mustard
  • 2 scallions, chopped
INSTRUCTIONS:
  1. Preheat oven to 375°F. Place chicken on a large, rimmed foil-lined baking sheet. Season chicken with salt and pepper. Cover with foil and bake until juices run clear and no longer pink inside, about 25 minutes. Shred or chop into bite-size pieces; place in a large bowl. Reduce oven temperature to 350°F.
  2. Meanwhile, whisk together 1/4 cup vinegar, oil and 1 tbsp chives. Generously brush mixture on all sides of portobellos. Place portobellos in 2 large baking dishes, cap sides down. Pour remaining mixture over portobellos and set aside to marinate for 20 minutes.
  3. Meanwhile, cook quinoa according to package directions.
  4. To bowl with chicken, add quinoa, spinach, remaining 3 tbsp chives, walnuts, 1 1/2 oz cheese, shallots, garlic and mustard. Drizzle remaining 1/4 cup vinegar over mixture; toss to combine.
  5. With portobellos still in baking dishes, fill each with about 1 cup chicken mixture, packing it tightly with the back of a spoon. Sprinkle remaining 1/2 oz cheese over filling. Cover with foil and bake for 15 to 20 minutes.


Home Circuit


SPOTTY DOGS 
BOX PRESS UP
WALL THRUSTS 
.
..
.
PUNCHING
FRONT LUNGE
SWIMMING 
.
..
.
HIGH KNEE RUN
WALL PRESS UP 
STRIDE JUMPS 
TRICEP DIPS
SQUAT 
DORSAL RAISE
.
.
.
Aim to work through all 12 exercises - giving yourself enough rest between each exercise so that you can perform the next. Look at working for a total of 20 - 30 seconds for each exercise, with a minimum of 15 seconds rest, then repeat the next exercise for 30 seconds until all exercises have been completed.
Once you have completed all 12 exercises walk around your home for 1 - 2 minutes to enable the heart rate to come down gradually, taking in some water if you need it, then repeat the workout routine again for a further 20 - 30 seconds with 15 seconds rest between exercises.
As you become fitter, aim to increase the length of time on each exercise to 40 - 45 seconds, if you find 30 seconds is too hard, reduce the workout time to 20 seconds.
Remember the secret to fitness is consistency and variety - so keep up the good work, and when you can do 2 complete circuits at 45 seconds try the intermediate session.


Sunday, March 29, 2015

Complete Guide to Kettlebell Training (Infographic)


Complete Guide to Kettlebell Training


The-best-and-worst-exercises-for-losing-weight_50530416cebaa


Sugar free breakfast

sugar-free-cherry-muffins-recipe-lushious-eats
Sugar Free Breakfast Cherry Muffins
Author:
Recipe type:Muffins, Snacks, Breakfast
Serves:12
Cook time:
Total time:

Wake up and dive right into one of these Sugar Free Breakfast Cherry Muffins which will keep your blood sugar stabilized and keep you feeling full for hours!
Ingredients
  • 1¾ cup cherries, pitted
  • ½ cup almond milk
  • ¾ cup applesauce
  • 2 tsp vanilla extract
  • 3 tsp butter, melted
  • 2 large eggs
  • 2 cups whole wheat flour
  • 1 tbsp ground flax seeds
  • 2 tsp baking powder
Instructions
  1. In a large bowl, mix baking powder, flax seeds and flour. Stir in milk, vanilla extract, eggs, apple sauce and butter. Mix well.
  2. Stir in cherries, mix slowly.
  3. Using a muffin tray, scoop mixture evenly into each cup.
  4. Bake on 350F for 25 - 30 minutes, or until toothpick comes out clean.


Saturday, March 28, 2015

Fighting Fit


https://www.youtube.com/watch?v=8kaPK4jtQUg

Get on your ball

THE WORKOUT

Complete the following reps for each exercise in the order below for a total of one round.
No resting in between each exercise, only moving on to the next exercise :)
After completing one round, rest up to 2 minutes and continue to the next round.
Complete a total of 3 rounds…..but if you’re really good with the ball…..aim for 6 rounds!!
Oh & you’ll need a pair of dumbbells…or you know…a filled 2l water bottle; whatever works!

15 Inner Thigh Squeezes
15 Bent Over Flys
20 Reverse Bicep Curls
20 Chest Presses
15 Hip Bridges
20 Skull Crushers
15 Back Extensions
20 Lunges (per leg)
10 Ab Rolls 
 Stability Ball Challenge {with dumbbells} Workout | KAMA FITNESS

THE EXERCISES EXPLAINED:

INNER THIGH SQUEEZE: Sitting on the ball with both knees bent, stabilize yourself with all core muscles. SQUEEZE your core!! Ok, now that you’re stable – squeeze your thighs in & hold for 2 – 3 seconds then release & repeat. *
This exercise can be really tricky !! Keep your tippy toes on the ground for added support. If you don’t have to do so, then you can come give me some of your core strength.
BENT OVER FLY: Sitting on the ball, with your feet together & knees bent to a 90 degree; bend forward holding a dumbbell in each hand, palms facing each other & dumbbells in front of your legs. Chest to your knees. Raise the dumbbells with a slightly bent arm as far upwards to the ceiling as you can – without bringing them past your shoulders. Pause & release.
*Remember to keep a flat back.
REVERSE BICEP CURL: Remain sitting on the ball & hold the dumbbells in each hand with palms facing the ground. Keep your arms straight, upper body slightly bent forwards & dumbbells beside your calves. Bend your elbow, raising the dumbbell into your shoulders to complete the reverse curl. Pause & release.
*Your weight may need to go down for this exercise as it isn’t targeting the same bicep muscle as the regular bicep curl would. If so, not to worry – practice makes bigger & sexier arms ! ;)
CHEST PRESS: Sit on stability ball, walking forward with your feet as you roll your back onto the ball. Keep your upper back positioned on the stability ball with knees bent at a 90 degree and keeping your back straight. Keep your core tight and hips high. With your arms bent at a 90 degree angle, hold dumbbells with your palms facing towards your feet. Slowly push through your chest and raise dumbbells until arms are straight in front of you, bringing dumbbells close together. Slowly bring dumbbells back down to starting position.
HIP BRIDGE: Place the ball under your shoulders as you would for the chest presses. Keep your hips aligned with your body to begin. Hold dumbbell with both hands, resting slightly on top of your hips. From this point, lower your hips as far as you can without sacrificing form, then push back up through your hips raising them as high as you can.  Repeat.
SKULL CRUSHER: With your upper body & shoulders on the ball, feet flat on the ground and knees bent at a 90 degree, hold a dumbbell in each hand, directly above your head,. Palms facing each other, bend your arms bringing the dumbbell into your forehead. (Not hitting yourself of course – you want to keep it a few inches away from your face.) Hence the name – skull crushers.  Release & repeat.
BACK EXTENSION:  Position stability ball underneath your core, keeping your legs straight & toes on the ground behind you. Keep your upper chest off the ball, back straight, core tight & place your hands behind your ears while looking towards the ground.Using your lower back to perform the movement, raise your upper body up away from the ball, squeezing your lower back & core, pause & release.
LUNGE: Stand in front of the ball. Hold a dumbbell in each hand, beside your hips during the entire exercise. Lift one foot up & place the top of your foot on the ball behind you. Bend your front knee as you lower your opposite knee to the ground. Be sure your front knee doesn’t go over your toes & keep a nice flat back & chin high. Use those thigh muscles to push yourself back upwards & repeat.
AB ROLL: Begin on your knees, placing the ball in front of you. You want to roll the ball out so when you place your forearms on the ball, your elbows are right near the edge of the ball and your palms are together, in the centre of the ball. This is the starting position. Now, push the ball away from your body, (using your abdominals) as far as you can while leaning towards the ball, then pull the ball back towards you (again using your abdominals) until you bring yourself back to starting position.
*This exercise can be really hard, to make it easier don’t roll out as far.


http://kamafitness.ca/2014/01/16/stability-ball-dumbbell-challenge/

Great start to the Weekend

THE COUNTRYMAN PRESS 2015

Weight-Loss Smoothies: Spinach and Avocado

Half an avocado per serving makes this smoothie totally worthy as a meal replacement. To make it even more filling (and flavorful), Cassie Johnston—whose new cookbook Chia, Quinoa, Kale, Oh My! is out now—adds peanut butter.
Makes 2 servings
1 avocado, pitted
1 cup fresh spinach
1 large ripe banana
1 tablespoon natural peanut butter
1 cup milk
Handful of ice cubes


Friday, March 27, 2015

Pick & Mix Workout


Power Workout: Unleash Your Inner Beast


Animal Flow
Created by Equinox consultant, Michael Fitch, with true power and athleticism in mind, “Animal Flow” is an instinctive new way to reconnect with one’s body, focusing on how it moves and functions. “I lifted weights my whole life, but when I finally reached my goal, I realized that I was constantly injuring myself, had joint pain, and felt just awful overall,” says Fitch. “I decided to step out of my comfort zone, put the weights down and focus on bodyweight-based practices only.”
Fitch explored gymnastics, parkour and break dancing, and noticed that across all the disciplines there were adaptations of animal movements — movements that have been around forever. He also became interested in the way you could flow from one move and explode into another. Fitch decided to combine primal moves with flow transitions, and this revolutionary program was born. Try it and see how powerful your body is.

The Workout

Repeat the entire circuit two to three times through, resting 30 seconds between exercises, and two minutes after completing each circuit.
Animal Flow Front Step
1. Front StepsStart in “loaded beast position,” similar to child’s pose but with knees and shins off the ground, arms extended forward, and hands on the ground pushing back into your heels. Head is facing down so your spine is neutral (a). Pushing away from the ground with your feet and arms, spring forward replacing your left hand with your left foot, knee bent and heel landing flat on the ground, left arm ending in the air. Your right leg extends and knee touches the ground (b). Return to starting loaded beast position and repeat on the right.
Reps: 10 on each side
Animal Flow Side Kick Through
2. Side Kick-ThroughsStart in “static beast position,” on all fours, hands under shoulders, knees under hips, pushing into the ground with your toes and hands so your knees and shins are lifted off the floor (a). Simultaneously lift your left arm off the ground as you kick your right leg under the body and through until it is fully extended forward, shifting your weight onto your right arm and supporting left leg, chest now facing the ceiling (b). Return to starting static beast position and repeat kicking the left leg forward.
Reps: 10 on each side
Animal Flow Vertical Frog Leap
3. Vertical Frog JumpsPlace your feet a little wider than shoulder-width apart, toes pointed slightly outward, and squat all the way down until your palms are flat on the ground in front of your feet. Shoulders are pulled back and spine is in a vertical line with the ground, facing forward. Feet should be flat or as close to flat on the ground as possible (a). Explode upward jumping as high as you can while fully extending your arms above your head (b). Land lightly on your feet, and go right back into the starting position.
Reps: 10 to 15
Animal Flow Plyo Push-Up
4. Plyometric Hand Change Push-UpsGet into a push-up position, hands under your shoulders, feet slightly apart. Perform the downward part of a push-up slowly (a). Then, explode up from the push-up with enough momentum to lift your hands off the ground and separate them further, landing in a wider position (b). In this wider position, slowly perform the downward part of your next push-up (c). Explode up again and this time move your hands inward, back to a narrow push-up position.
Reps: 5 in each hand position
Animal Flow Jump Pull
5. Jump Pull-UpStand on a step in front of a pull-up bar, making sure the step is high enough that you can comfortably grab and hold the bar, palms facing forward (a). Grasping the bar, jump straight up off the step and use your arms to hold yourself so that chin is above the bar, feet dangling in the air (b). Using just your arms, slowly lower yourself down until your feet are back on the step.
Reps: 10 to 15